
How to Write a Bullet-Proof Blog Post Outline in 5 Minutes
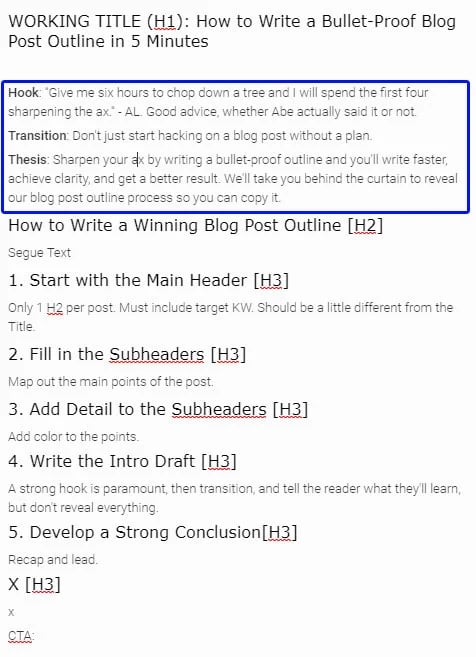
"Give me six hours to chop down a tree and I will spend the first four sharpening the ax." - Abraham Lincoln.
That's good advice, whether Abe actually said it or not.
When you get a blog post idea in your head, it's tempting to sit down and start banging on the keyboard right away.
But that would be a mistake.
You'll run off on rabbit trails, have difficulty tying your thoughts together, and fail to lead your reader down a logical path with an obvious next step.
Don't just start hacking on a blog post without a plan.
Sharpen your ax by writing a bullet-proof outline and you'll write faster, achieve clarity, and get a better result. We'll take you behind the curtain to reveal our blog post outline process so you can copy it.
How to Write a Winning Blog Post Outline
At Lean Labs, generating organic traffic through blog posts is our specialty. We regularly 10x our clients' traffic, leads, and opportunities by churning out hit blog posts that Google loves. (Read more about our seven secrets to 10x growth here.)
Over the years, we've refined our blog post process and a big part of the success of our efforts comes from building strong outlines up front. Here's the step-by-step process we use to craft bullet-proof blog post outlines. We've captured screenshots of this post outline as it developed as an example.
1. Start with the Main Header
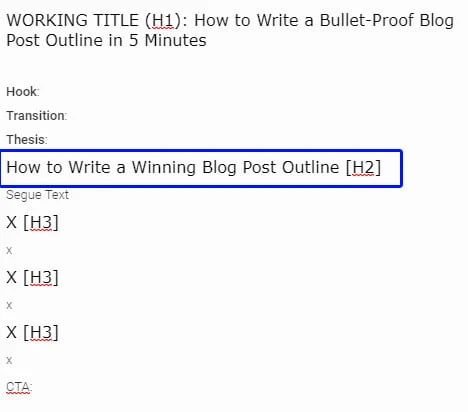
Google favors posts with a clear hierarchy which means subpoints need to be nested inside of main points. The post title is the first header (H1), and that's the most important text in a post. Make sure that you do your keyword research ahead of time and use the exact keyword in the H1.
The target keyword for the post you're reading is "blog post outline," and the full title we crafted around it is "How to Write a Bullet-Proof Blog Post Outline in 5 Minutes."
You'll also want to use the exact target keyword in the H2. We usually change the H2 a little from the post title (H1), just so it isn't repetitive on the page. Here, the H2 is the first header in the body of the post, and we've altered it slightly from the H1, "How to Write a Winning Blog Post Outline."
There should only be one H2 in each post. This single dominant header is a signal to Google that these are the words that this post is about, and, because it's an echo of the title, Google knows exactly what people will get when reading this post.
RELATED READING: 5 Blog Post Examples You Can Swipe and Use
2. Fill in the Subheaders
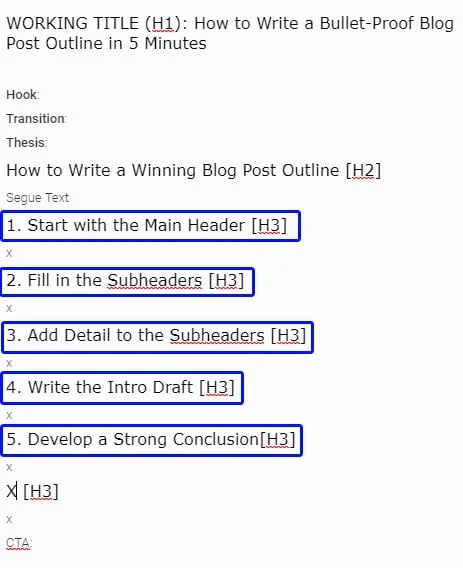
Next, map out the main points of the post as H3s. We usually try to have at least three H3s in each post. These subheaders can include the target keyword, but don't have to. Be careful not to overdo it and stuff keywords in so much that it seems unnatural.

If you do a search for the target keyword on Google and the results page includes a featured snippet with a list at the top, it's a good idea to number your subheaders. This helps Google identify the prominent components of your list and you'll have a better shot at getting into the coveted Position 0.
It may be tempting to get really creative with your subheaders, but don't do that. Keep in mind that people usually skim blog posts, looking at the headers. If your headers are cryptic, requiring readers to read the content under them to understand them, you'll turn people off. Subheaders should make sense without any explanation.
3. Add Detail to the Subheaders
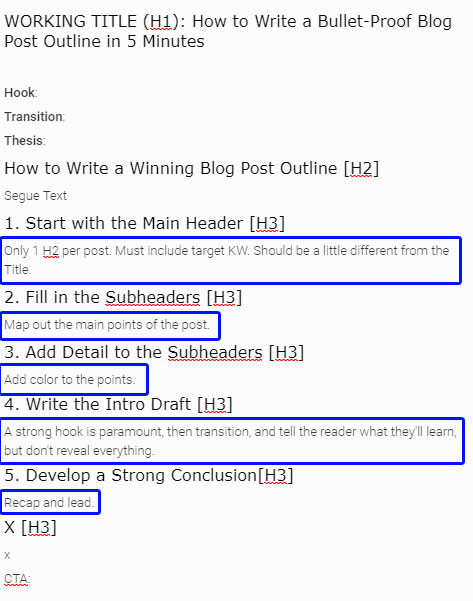
Now, add color to the points in your subheaders. Even if you know exactly what you have in mind to include in each point, you should have someone else review your outlines before you start writing, and they may not know the direction you want to take each section.
These notes will keep things clear for everyone.
Also, it may be a day or two between the time you write the outline and the time you actually start writing, so you'll want some notes to refresh your memory about the ideas you had when you wrote the outline.
4. Write the Intro Draft
I usually wait until I've mapped out the post before I start writing the blog intro. This is partly because I'll want to use the intro to tease the content below it, and I may not know what that content is until I've worked my way through the main points.
Why would I go ahead and write most of the intro in an outline?
Intros are the most important part of your post. If you can get off to a strong start, you'll have a much greater chance of getting the reader all the way through the post and getting them to take action at the end.
All of our outlines are peer reviewed by another team member, and we give feedback on the intros because they're just so dang important.
You'll notice that our intros contain a Hook, Transition, and Thesis. This organizational structure comes from Neil Patel's Ultimate Guide to Writing Blog Post Introductions. In Neil's guide, he offers seven strategies for creating introductions that hook the reader and make them want to spend time with the post.
- Hit with a Controversial Opening - “Contrary to popular belief...”
- Offer the “Why” of Your Content - Focus on benefits
- Lead with a Memorable Story
- Get Readers Nodding by Stating the Obvious
- Use an Analogy, Metaphor, or Simile
- Cite a Shocking Statistic
- Open with a Thought-Provoking Question
I have a printout of these strategies on the wall next to my desk to help me out when I get stuck on an intro. You can access it and print it yourself if you want.

Once you get a killer first sentence or two, transition to the main point of the post, and then tell the reader what you're going to give them in the thesis. But don't give everything away in the intro. Give them a reason to keep reading.
You'll also find some good tips for intro writing here from Marcus Sheridan. Marcus says the first paragraph should show expertise and empathy and disarm the reader by showing that you're unbiased.
ALSO CHECK OUT: Blog Introductions: Examples of Both the Good and Bad (And How to Be Awesome) and How to Write Better Blog Intros & Engage Readers ASAP (With Examples!)
5. Develop a Strong Conclusion
We don't write out our conclusions in as much detail as we do the intros, but we do give them enough meat in the outline to make it clear how we're going to transition from the post body to the call to action at the end.
We're recapping the content and leading to the next step.
Don't just get tired of writing and fizzle out. Give your conclusions some punch to wake the reader up and get them motivated to take action. It's often a good idea to go back to your strong hook statement at the beginning to bring the post full circle in the conclusion. It puts the bow on the package and lets the reader know it's time to move on to the next step in the buyer journey.
You should always have a next step in mind for the reader and you should always make that next step clear. That's the reason we include the specific CTA we're going to use in the outline.
Keep in mind that you're leading the reader down the sales funnel with each piece of content. If the post you're writing is on a Top Funnel topic (like this one), use a Middle Funnel offer as the CTA. If the post is on a Middle Funnel topic (about the type of product or service you offer), use a Bottom Funnel offer as the CTA. Don't send the reader back up the funnel if they're already considering purchasing.
RELATED READING: How to Write a Blog Post: The A-Z Guide From Ideation to Publishing
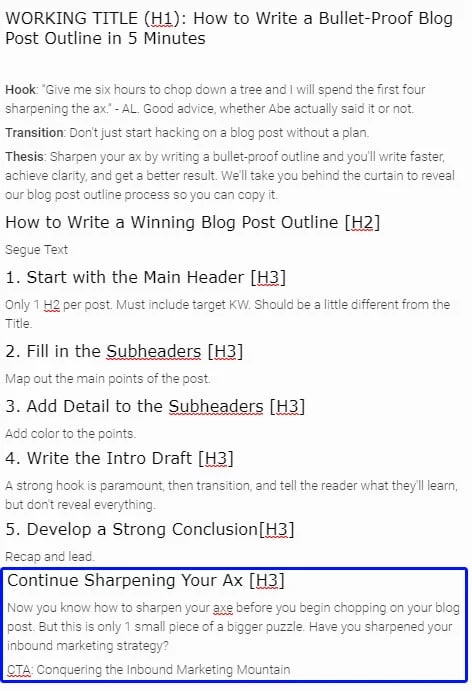
Continue Sharpening Your Ax
Now you know how to sharpen your ax by creating a great outline before you begin chopping on your blog post. But this is only one small piece of a bigger puzzle. You need to have a solid strategy for every step of the customer journey.
It's time to sharpen your inbound marketing strategy. We've developed a free eBook to help you do that. In Conquering the Inbound Marketing Mountain, we provide insights into:
- Inbound marketing goal setting
- Defining and detailing personas
- Tips for building a team of Inbound Marketers
- Key components of your editorial calendar

About Lean Labs
The only outsourced growth team with a track record of 10X growth for SaaS & Tech co's. 🚀
Explore Topics

Discover the Hidden Strategies We Use to 10X Our Clients Growth in 36 Months!
The Growth Playbook is a FREE guide to planning, budgeting and accelerating your company’s growth.